
T-Shirt Tutorial: Backstitched Reverse Applique
First off, let me apologize for leaving the accent mark off the end of the word “applique”. I don’t know how to put it on there but I do know that applique has an accent mark, so in this instance, I’m ignorant of how to put one on there and not about the actual existence of the mark. What I don’t know would fill many books, but this is not one of the things that would be in those books. Okay? Thanks y’all!
Now, let’s get to the tutorial.
What you need:
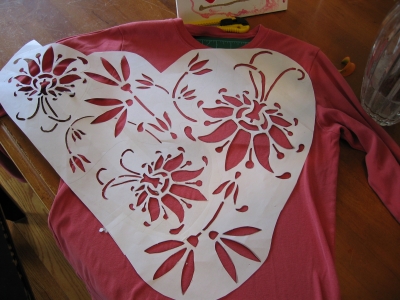
– stencil (mine can be found here. Enlarge the image so that the large flowers are about 6 inches across. This will ensure that you have enough space to cut within the larger petals to reveal the accent fabric.) I used a copier to enlarge the image and then cut the shapes with an exacto knife.
– t-shirt – should be mostly cotton jersey. I’ve been using used t-shirts. This has an advantage in that I know how the fabric wears (doing this project on a t-shirt that would turn around and pill on you would be a shame) and also, I know that the t-shirt will already have done all the shrinking it is going to do.
– accent fabric – cotton jersey here, as well, (used t-shirt, again) and in a shade that complements or contrasts with the other fabric. In all my projects thus far, I’ve used a complementary color for the accent fabric and matched the thread to the accent fabric.
– thread – embroidery floss, the regular cotton kind. You’ll probably need about 4 skeins, give or take. This will cost you a whopping $1.50 or something like that.
– a large eyed embroidery needle – I actually keep three of these threaded at one time. It saves time, and I think that Frank would approve of me threading three at once. The eye need not be huge, just big enough for 2 strands of thread to get through there.
– straight pins
– sharp small scissors
Now, I should tell you that this is my own simplified version of reverse applique that I learned from Natalie Chanin’s book, Alabama Studio Style: More Projects, Recipes, & Stories Celebrating Sustainable Fashion & Living
and it is a much more basic version than the beautiful creations with beads and fabric paint and much more that she shares there. So, for that reason and many more, you should check out her book, if you can. I can only share this version because it is less jingle-jangle making me more likely to wear it. Sequins and beads are everyday for some, for me they are jingle-jangle material, and highly unlikely to be worn, although I love the way those things look on other people. So, y’all, don’t be plain like me. Dare to jingle-jangle. Who knows, maybe I’ll put beads on my next shirt.
Here we go:
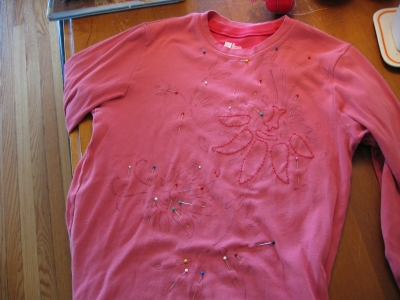
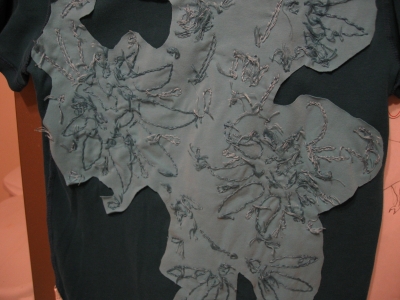
1. Transfer your stencil design to the right side of your top fabric layer. I do this with a ball point pen though a fabric marker would be good, probably.
2. Attach backing fabric to top fabric. Put the cut backing fabric, right side up, behind the area of the top layer of fabric to be appliqued, making sure that the grain lines are running in the same direction. Pin the two fabrics together. Here is where I employ my sewing mantra, “Pin it, and then pin it some more.”
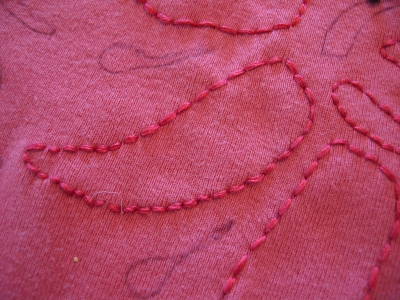
3. Stitch around stenciled shapes. You will be using 2 strands of embroidery floss which will end up being 4 after you’ve threaded your needle and knotted off. Don’t forget to smooth the thread between your fingers a few times after you’ve threaded the needle but not before tying a double knot. Now, stitch around your shape using a backstitch. A tutorial for backstitch is here:
.
It’s a really easy stitch and looks impressive outlining the shapes. Continue knotting off after each shape is stitched around. Always tie off with a double knot. Trim the remaining thread tail to about 1/2 inch after you knot off.
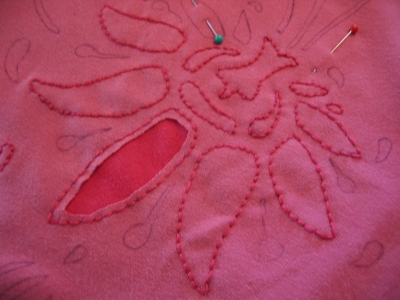
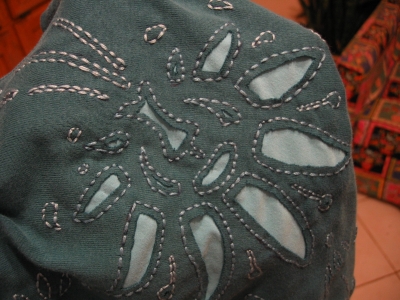
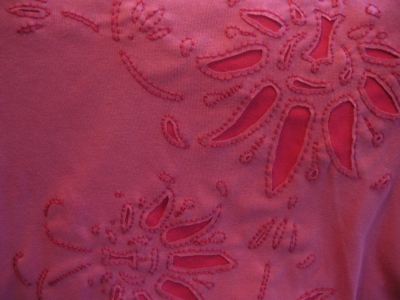
4. Insert the scissors into a shape that you want to cut being careful to only puncture the top fabric. Trim so that you’re cutting no closer than 1/8″ to your stitches.
5. After you’ve finished (and you might decide not to cut into the smallest shapes) you may want to turn the t-shirt inside out and trim away any extra fabric, again, leaving 1/8″ of fabric, at least, on the reverse side.
Back:
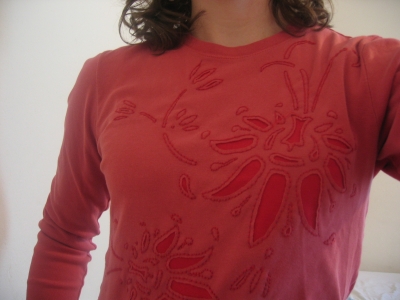
Front:
Now, you’re done! This is a great, inexpensive, fun project. I especially like that the supplies are few and that the finished project is so wearable.
Hope that y’all had a great Sunday.
Pingback: Reverse appliqué | Sew Simple Dress